
Have you ever thought about how vellum is produced? Chosen by artists for its unique surface, using this medium can result in an illustration with exquisite detail. This week Stephen Caine an ABA member, describes the art of producing his own vellum. A journey that can start at the roadside and end at a ready to paint surface.
Sourcing the skins
The word Vellum derives from the French veau which refers to a parchment made from calf skin. Where parchment (noun) is " a (piece of ) material used for writing on, made from animal skin ". (1)
The skin is composed of three layers with the outermost layer known as the Epidermis, the middle layer as the Dermis and the innermost layer as the Hypodermis. Vellum is primarily made from the Dermis and its properties (surface finish) are determined in part, by how much of the other layers are removed during processing.
Traditionally calf, sheep, and goat were used for making vellum but other animals, including pig, deer, donkey, horse and other more exotic species have been used. The vellum you purchase from an art supplier is usually sourced from calf or goat. When making my own vellum I mainly use Roe Deer (Capreolus capreolus) skins and sometimes Red Deer (Cervus elaphus) mainly because I have easy access to these species where I live. Like all vellum, each skin can look a little different but I do like this because you can pick the finished skin to suit the project. Not surprisingly, summer skins are thinner than winter skins as the length of the fur is shorter and there is less fat, so a summer skin tends to be easier to prepare. The thickness of the skin is also dependent on the age of the animal and this is one of the reasons commercial companies tend to use calf skins.
Most skins I receive are from animals that are shot for culling purposes or for meat but they also come from "roadkill " . A fast car and a slow deer do not usually result in a positive outcome. Where I live in the North East part of Scotland, official figures show that deer are the most reported road kill with June being the peak month.
I remember an incident once when I spotted some roadkill when driving along a country road. Just as I pulled over to retrieve the carcass, another vehicle pulled up on the opposite side of the road with the same intention. Magnanimously they just waved me on and it was in the back of my car in an instant.

In this example I have used skins from a Roe deer collected from the Stalkers house. A Stalker by the way is a British term for an individual that pursues a deer (usually on foot) with the intention of hunting for meat, as a trophy or for culling to manage numbers.
Salting

The first stage in preparing the skin is to cut off any fat or meat that has been left. The skin is then rinsed a few times in fresh water to remove any blood and then laid out, flesh side up in a dry location and covered with a layer of salt and left for a few days. The initial layer of salt is removed and then another layer is added and left for a further few days. Adding salt helps to preserve the skin if you need to leave it for a period and it also keeps it supple by absorbing moisture from the air. The skin is then placed in clean water for a few days with regular changes to remove any traces of the salt.

Liming
While the hide is soaking to remove the salt make up a mixture of hydrated lime (Calcium hydroxide) adding around one large cup to each gallon (4.5L) of water. Hydrated lime is usually made from "quicklime" by adding water to the highly reactive Calcium oxide which is produced by burning limestone. Hydrated lime is used to help remove the hair by loosening the attachment of the hair to the hair follicle. This alkaline solution also removes some of the lipids or fats and changes the collagen structure in the skin. It is important to keep moving the skin around in this phase to ensure that all parts are exposed to the hydrated lime solution. There is no fixed time limit for soaking as it can take up to two weeks before the hair comes off easily. Just keep checking.
Fleshing

The next step is a little messy as it involves removing the hair in a process known as fleshing or "scudding". Traditionally a curved wooden or dull or polished metal scraper is used on a large curved surface like a log or similar as shown in figure .
You can also use your hands or a round smooth pebble but with the wonders of technology, I now use a pressure washer on a flat surface! It's quicker and I can adjust the pressure of the jet of water by changing the distance from the skin to the washer head. If you do use a scraper it is best not to use one made of metal with a sharp edge as the tool can mark or damage the skin badly and this cannot be corrected. Any bits of flesh or fat on the other side of the skin can also be removed at this stage.

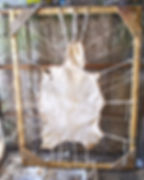
Once all the hair has been removed and while the skin is still wet, tie it to a drying frame making sure there are many points of attachment and it is a tight as possible as shown in the figure. Since the skin is very slippery at this stage it can be difficult to attach the cord but one technique is to wrap the skin around a small pebble and then tie the cord around this and attach it to the drying frame. I find if you just cut slits near the edge of the skin to attach the cord this works pretty well. As the skin dries out it will contract and become really taunt which is essential.

Scraping & Pouncing
This next bit is when the magic happens. This involves scraping the inside or flesh side of the dried skin using a curved metal blade known as a lunellum (half-moon blade) as shown. You can make one out of a lawn edge trimmer or a curved herb knife, the type you use with two hands. As you scrape the skin the transparency increases as it gets thinner. An orbital sander with a fine grade of paper has also been used at this stage but patience and care are essential as you do not want to damage the skin at the final stage. To make it more interesting you could leave some membrane on the back and this will show some organic patterns on the painting side.
The skin can now be cut out of the frame and when you are ready to paint, the back side (the epidermal side) can be rubbed with a pumice stone. I tend to use pumice powder on a muslin cloth to prepare the surface just before I start applying paint.
Depending on the origin of the skin, summer or winter, Doe or Buck or the amount of scraping and poncing, each finished vellum piece will have its own character. For example, the vellum shown in the figure below shows five samples of Roe deer vellum winter and summer. Summer vellum tends to have a smoother finish (less "tooth") and winter a little more "tooth" The two top right pieces in the figure are very smooth, top left and large piece have more "tooth" and the semi transparent piece very smooth.

Then to Paint
In this figure I am outlining the subject to be illustrated by "indenting" using a rounded stylus.

And finally, In the figure below I have started applying some pigment to the vellum. The powder behind the vellum is chalk, which I use when painting if I want to fade back or make corrections. For those with a keen eye, you may have noticed the brush is a little different and so it is. I am using "pin feathers" but that's a story for another day.

Well that's it. " Skin to Surface " a quick overview of how I make my own vellum. It is a long process but really satisfying when you finally sit down in front of a piece of vellum you have made, brush in hand, ready to apply the first stoke.
If you would like more information about producing vellum then please don't hesitate to contact me. I would love to hear from you.
Stephen Caine
November, 2022
If you would like to visualise the basic steps in making vellum then there are a few YouTube video links in the References for making parchment. The steps are a little different but the process is very similar.
References
1. Cambridge Dictionary -" Parchment - a (piece of a) material used for writing on, made from animal skin."
3. YouTube - How Parchment is made - Doomsday - BBC2
4. Medieval Manuscripts - Scriptorium Parchment
house books of the Mendel and Landauer Twelve Brothers House Foundations
Hanns (Hans) Judge - Rotgerber (tanner; red tanner) professional group:leather manufacturing industry - 1609
5. Commercial Suppliers of Vellum:
UK - https://www.williamcowley.co.uk/products/calfskin-vellum/